Welcome to the Mechanic's Mate Quick Start Guide
Thank you for reviewing our maintenance management software. The steps listed below will better acquaint you with the product and and its' implementation. We suggest you print a copy of this guided tour and mark off the steps as you work through them.
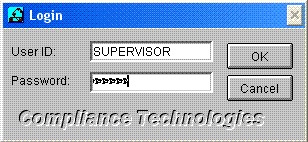
- When initially run, the software will prompt you to login. Please login as user "supervisor" with password "super" as shown below. The user id and password are case insensitive. This is the default user and password for new installations.
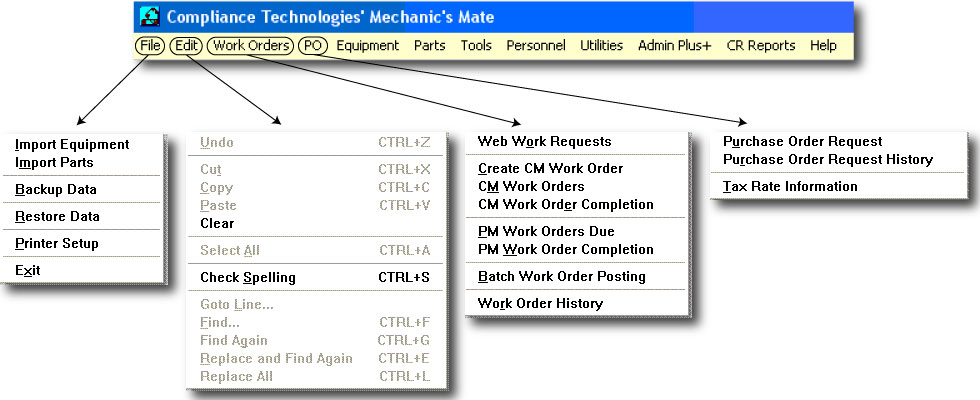
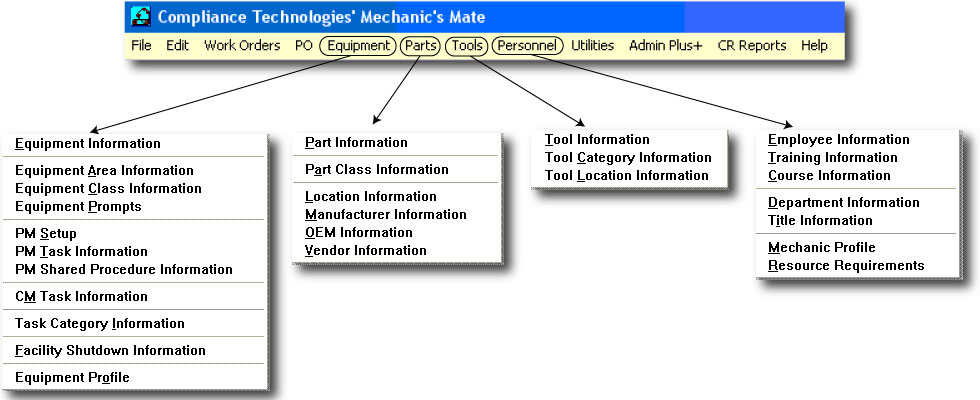
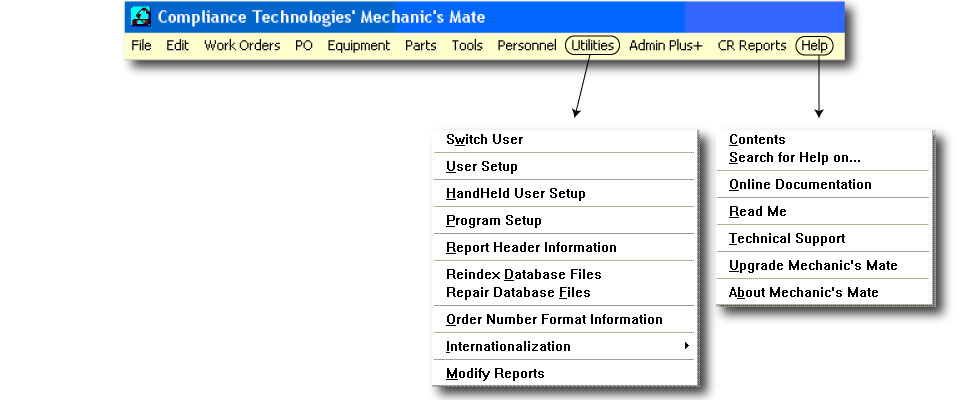
- The software will display a system menu at the top of the main form. Below is a pictorial breakdown of the menu system to better acquaint you with the location of the various functions within the software. Please study this for a minute or two.
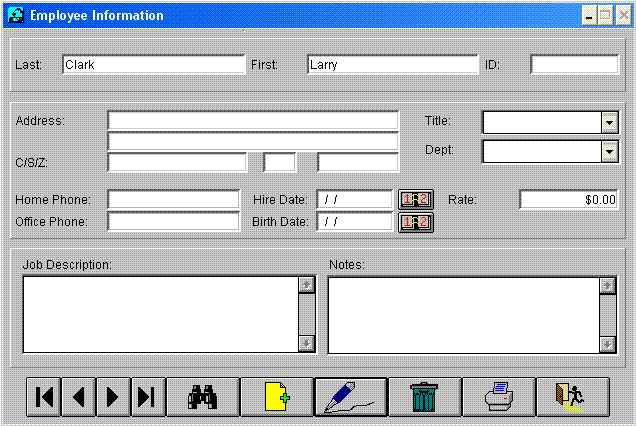
- Navigate via the system menu to Personnel->Employee Information. You should see the following Employee Information Form pictured below.
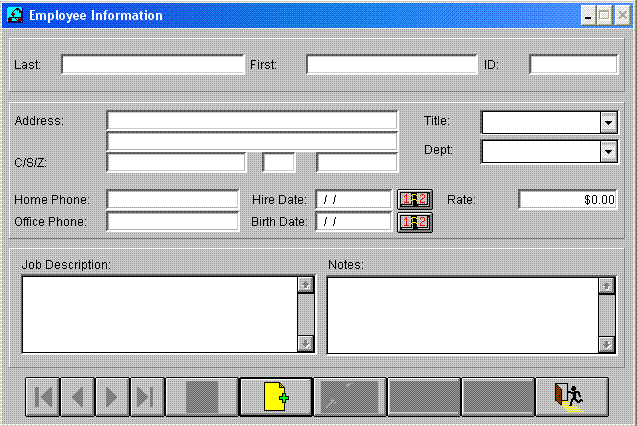
- Please notice the only button enabled on the toolbar at the bottom of the Employee Information Form is the Add Button:
 . This behavior occurs when no employees are currently defined and Add is the only logical option available. Please be aware of the toolbar's smart behavior of disabling buttons which do not apply to the current data. This sort of behavior occurs throughout the Mechanic's Mate Software.
- Please click the Add Button: . Notice the data entry portion of the form is now enabled for user input and may be clicked on. This behavior occurs within forms throughout the software. Data entry portions are typically enabled only when the form is in Add or Edit Mode.
- Please notice that your toolbar has toggled into Save or Cancel Mode as shown below. This usually occurs when a user has chosen to Add or Edit information within a form. This behavior occurs throughout the Mechanic's Mate Software.
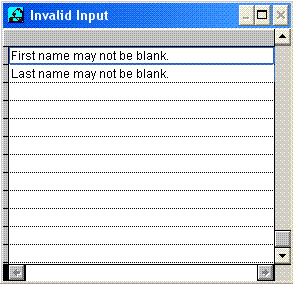
- Prior to entering any information, let's perform a demonstration of how the software handles invalid form input. Please click the Save Button:
 . An Invalid Input Form as pictured below should be displayed. This occurs since Last Name and First Name are required fields and may not be blank.
- Please press your keyboard's ESC or ENTER Key. This will close the Invalid Input Message Form pictured above.
- Enter your Last and First Name at the top of the form. The additional form information is not immediately required and may be completed later. Pictured below is a sample name entry.
- Please click the Save Button: .
- Your Employee Information form should look as pictured below. Notice on the bottom of the form, all of the toolbar buttons are now enabled.
- As a demonstration of editing employee information, let's pretend you would like to change your Last Name. Click the Edit Button:
 . The Employee Information Form is now in Edit Mode. Please change your Last Name to something other than what is currently displayed.
- Let's suppose you changed your mind about the changes you just made. Please click the Cancel Button:
 . Notice that the changes were not saved since you pressed the Cancel Button.
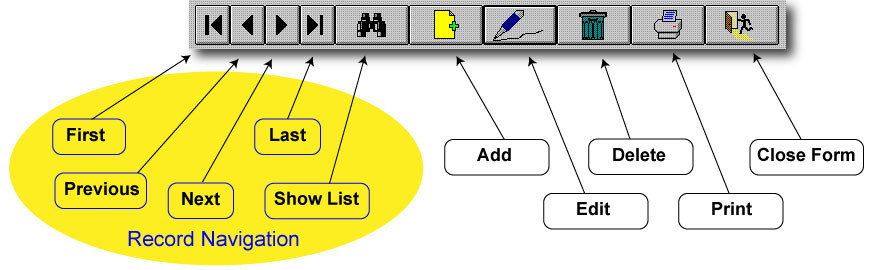
- Below is a pictorial breakdown of a fully enabled toolbar. Please study the button functions since this applies to nearly all of the forms within the Mechanic's Mate Software.
- Please click the Close Button:
 . The Employee Information Form should now close, and you should be returned to the Mechanic's Mate Desktop.
- Please go back to the Employee Information Form and add an additional employee.
- Explore all of the buttons within the Employee Information Form by individually clicking on them. Their functionality should be very straightforward and intuitive. Don't forget the Calendar Button:
 next to the Hire and Birth Dates.
- If you have any "How To?" questions regarding the operation of the Employee Information Form, please contact Mechanic's Mate Technical Support at 727-742-6186 (9 a.m. - 5 p.m. EST) or [email protected]
- Congratulations, you have mastered the Employee Information Form! Most forms within the Mechanic's Mate Software operate much like the one you just learned; therefore, you are ready continue the tour at a much faster pace.
- Navigate via the system menu to Personnel->User Setup. The User Setup Form should now be displayed.
- Please click the Add Button.
- The User Setup Form image displayed below illustrates the steps we are about to take.
- Enter a User ID for yourself. "LARRY" was chosen for the sample. Note: User IDs are case insensitive.
- Click the Name Button. This will display a form which allows you to choose the employee associated with the user we are currently defining.
- Click the Enable All Button. This enables all privilieges for the user we are currently defining.
- Click the Save Button. You will be prompted to enter a password. Please choose whatever password you would like associated with the user you are currently defining. The password is not case sensitive.
- After saving, notice the toolar toggled, and an unfamiliar button is located on the toolbar between the Delete Button and the Close Button. This is the Change Password Button:
 .
.
- Congratulations, you have created a user within the Mechanic's Mate Software.
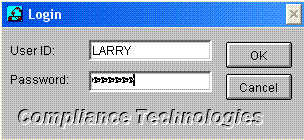
- Navigate via the system menu to Utilities->Switch User. The Login Form will now be displayed. Please login with the User ID and Password you created in the previous step (step 6). The image below shows a login with the sample user: Larry.
-
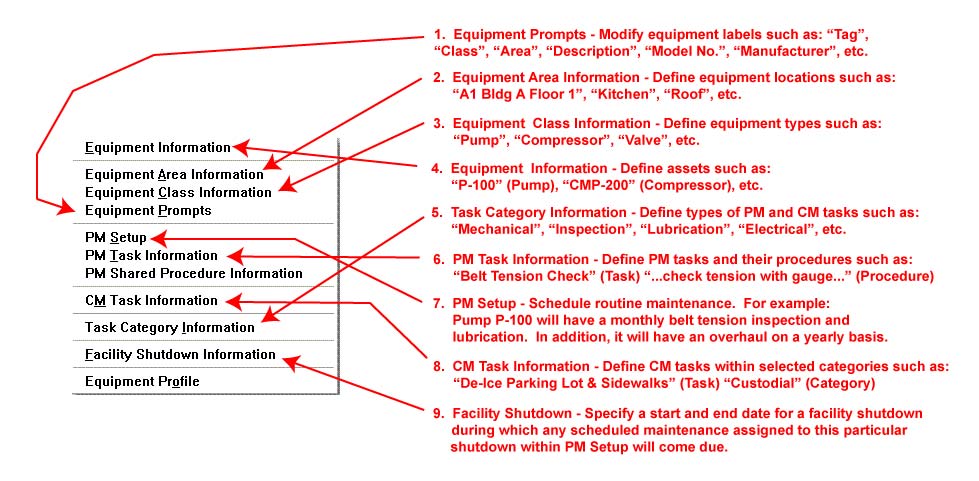
Our next set of steps involves exploring the Equipment Menu. Below is a pictorial breakdown of the Equipment Menu and the correct sequence for defining equipment and its' related information.
Equipment Menu Breakdown and Data Definition Sequence