Web
Work Request
This
chapter covers work order requests for facility maintenance.
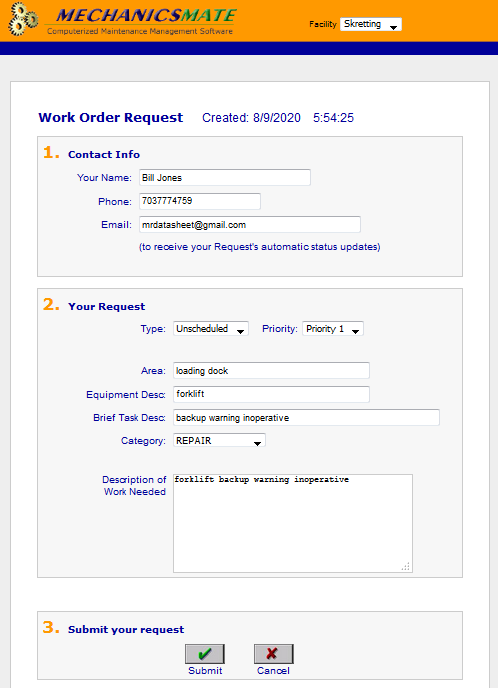
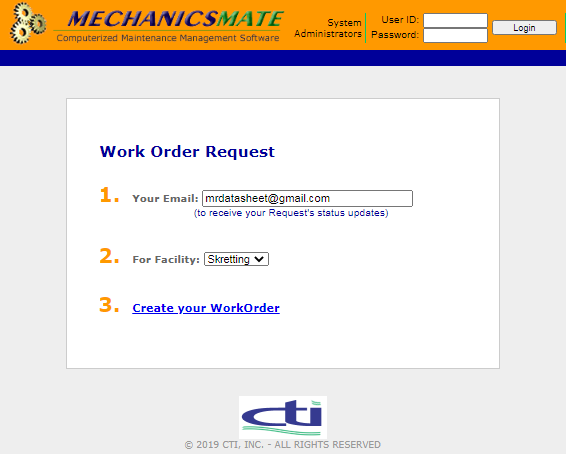
“Do you want to know a good way to reduce the number of phone calls your maintenance department receives?” MechanicsMate for the Web is the answer. Now, anyone with access to an Internet Browser can enter a work request. A basic flow of the way it all works is shown below.

Is double entry of information required? NO. The information input at the Web Request screen is imported into the MechanicsMate desktop software.
Background
For more than a decade MechanicsMate has been used by companies just like yours to improve quality, maintain consistency, save time, and reduce costs. MechanicsMate is being used in a wide range of businesses; including, gas processing, healthcare, medical centers, chemical processing, food production, manufacturing, and fisheries.
Our Customers Are Our Best Critics
With hundreds of users worldwide, our customers have led the way in recommending improvements. And we have listened. Although we would like nothing better than to take all the credit for the improvements to our software over the years, the credit goes to our best critics…our customers.
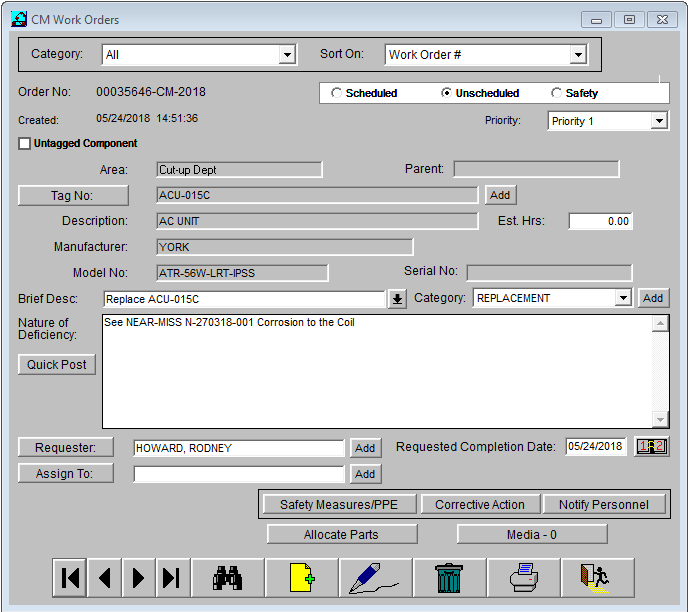
Our Corrective Maintenance Work Order screen is shown above. Users can complete the entire work order process from this single screen.
Corporate or Facility Intranet
Windows 2012-2019 Server OS running Roles/Features:
Roles
Web Server (IIS)
Web Server (IIS)\Web Server\Application Development\ASP
Web Server (IIS)\Web Server\Application Development\ISAPI Extensions
Web Server (IIS)\Web Server\Application Development\Server Side Includes
Web Server (IIS)\Web Server\Common HTTP Features
Web Server (IIS)\Management Tools\IIS Management Console
Web Server (IIS)\Management Tools\IIS 6 Management Compatibility\IIS 6 Management Console
Features
WoW64 Support
SMTP Server
Configuration Highlights/Troubleshooting Notes
Mechanic's Mate CM Web Work Request is a 32bit app.
Mechanic's Mate COM+ Application is named "Mechanics Mate MM5"
Allow IIS Intrinsic Properties should be enabled for "Mechancis Mate MM5" COM+ App components - verify with 32bit Component Manager - C:\WINDOWS\SysWOW64\mmc comexp.msc /32
"Mechanics Mate MM5" COM+ App Identity must be set to Admin account or one with sufficient privilege.
"Mechanics Mate MM5" COM+ App may need "Enforce Access Checks for this Application" to be un-marked.
"Mechanics Mate MM5" COM+ App components run in single threaded apartment model.
Application pool must be classic 32bit application pool, no managed code.
Set virtual folder to use classic 32bit pool via Add Application to the virtual folder.
ASP Server Side and Client Side Debugging should be enabled with errors sent to browser enabled.
"Show friendly HTTP error messages" should be disabled in Internet Explorer and debugging turned on.
IIS 6.0 Manager is necessary for SMTP Server configuration.
SMTP Server Smart Host setting should point to MS Exchange Server machine (if available).
Use the 32bit Registry Editor C:\Windows\SysWOW64\regedit.exe if verifying Mechanic's Mate CM Web Configurator settings.
Pre-Installation Steps
Log in as Administrator.
Install a Network Version of the Mechanic's Mate Windows' Application.
Ensure the Roles/Services listed in System Requirements are installed.
Configure Internet
Information Services (IIS) using Internet Services Manager
![]() .
.
Choose an
existing or create a New
![]() Web Site within Internet Services Manager for the Mechanic's Mate
CM Web Application.
Web Site within Internet Services Manager for the Mechanic's Mate
CM Web Application.
Create an IIS virtual directory for the Mechanic's Mate CM Web Application within the selected web site. This may be accomplished via the following steps:
Launch the
Virtual Directory Creation Wizard
![]() for the selected web site.
for the selected web site.
When prompted
for a Virtual Directory Alias
![]() or Short Name, you may enter "mmate" for example.
or Short Name, you may enter "mmate" for example.
For the Physical Path, please enter the full path for the folder which will contain the Mechanic's Mate Web Application Content (ASP and HTML). In our example, we used "c:\maint\cmwebapp".
Ensure the Connect As setting has sufficient privilege - utilize the Test button.
Please click the OK button to confirm your settings.
Create a classic 32bit application pool, no managed code. You may call it "32bitClassic".
Right click on the "mmate" virtual folder and choose Add Application and set the application pool to the "32bitClassic" pool that you just created.
ASP Server Side and Client Side Debugging should be enabled with errors sent to browser enabled for the "mmate" virtual folder.
"Show friendly HTTP error messages" should be disabled in Internet Explorer and debugging turned on.
Running the installation
Log in as Administrator.
Ensure that you have chosen or created the IIS Virtual Directory for this application during the Pre-Installation System Configuration. You will be prompted for this information during the installation process.
Run setup.exe from the Mechanic's Mate CM Web Installation CD.
If you have any questions, please contact Customer Support; otherwise; proceed with the installation as prompted.
Post-Installation Steps
Log in as Administrator.
Complete Component Services Configuration for the Mechanic's Mate CM Web Application.
Launch Component Services from Server Manager -> Tools Menu.
Navigate to the
"Mechanics Mate"
![]() COM+ Application within Component Services.
COM+ Application within Component Services.
Verify that
"Mechanics Mate" COM+ Application Components
![]() are installed.
are installed.
Launch the
"Mechanics Mate" COM+ Application Properties
![]() Dialog.
Dialog.
Within the Advanced Tab, set Server Process Shutdown to Leave running when idle. Click OK.
Within the
Identity Tab, set the application's identity
![]() which is the user account it runs under. The account will need the
following minimal privileges:
which is the user account it runs under. The account will need the
following minimal privileges:
Log on Locally. This may be set via Local Security Policy.
Access This Computer From The Network. This may be set via Local Security Policy.
Full Access to the "Compliance Technologies" registry key within HKEY_LOCAL_MACHINE\SOFTWARE. This may be set via Security->Permissions within the Registry Editor(Regedt32.exe).
Full Control permission for the Mechanic's Mate Application Folder and Subfolders. This may be set from the Security Tab within the Folder Properties Dialog.
Access to the local SMTP Virtual Server. Please see next step.
Verify whether the local SMTP Virtual Server is configured and running with Server Manager -> Tools Menu -> IIS 6 Manager. If NOT previously running or configured, the following settings should be configured within the Access Tab of the SMTP Service Properties:
Relay Restrictions should be set; so that, no computer is allowed to relay regardless of authentication. Relay is not needed for the Mechanic's Mate CM Web App.
Authentication should be set to Windows Security Package. Anonymous Access and Basic Authentication should be turned off.
SMTP Server Smart Host setting should point to MS Exchange Server machine (if available).
If you need help with this, please contact your IT Department or Technical Support.
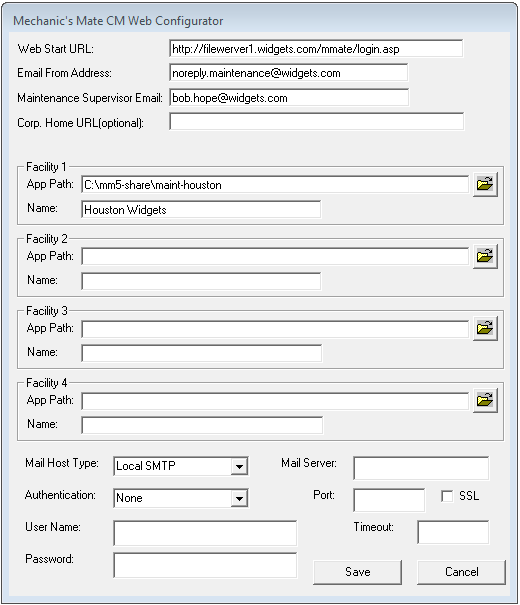
Launch the CM Web
Configurator as shown below from the Mechanic's Mate Menu Item
within your Windows Start Menu.
(Please
note that the < and > signs within the subsequent items denote
a text substitution and are not to be included within the actual
settings. Double quotes denoting the beginning and end are not to be
included either.)
Web Start URL should be set to: "http://<fully qualified domain name of app server >/<virtual directory name>/login.asp". An example would be "http://server1.southcohospital.com/mmate/login.asp".
Please enter the Email From Address which is used for email notifications generated by Web Work Requests. If you don't want to use an actual user's account, please use "mmate_auto_notify@<fully qualified domain name of server>"; so that it will be resolvable to the local SMTP service.
Maintenance Supervisor Email should be set to the desired recipient for notification of New Web Work Requests. An example would be "[email protected]". You may leave this field blank if you would like to disable email notification for new work requests.
Corp. Home URL is OPTIONAL and may be left blank. It is only needed when a corporate web page is directly linked to newworkorder.asp(New Work Requests) and the desired behavior is for a return to the corporate web page upon submission of a New Work Request. This feature is NOT applicable if newworkorder.asp is launched in a new browser window.
Please set the Application Paths and Facility Names for your data sets. Entries must be sequential. Application Path should point to the application folder(containing mechint.exe); this would be the parent of the data folder.
If running, please unload the application for the Mechanic's Mate Virtual Directory within Internet Services Manager; so that, the any changes may take effect. This is necessary since the CM Web Configurator Settings are cached as Application Variables.
Verify that the web site containing the Mechanic's Mate CM Web Application is "started" via Internet Services Manager
Calling the Web Work Request Interface
Providing users with the ability to run the Web Work Request.
Decide which page you would like to start on within Web Work Request. Choose a URL specific to the page you would like to land on.
Default
Splashscreen Page:
"fileserver1.widgets.com/mmate/default.html”

New
Work Request
Page:
"fileserver1.widgets.com/mmate/newworkorder.asp"
Login
Page (allows creation of a New Work Request or access to Web Work
Request Admin
Console):
"fileserver1.widgets.com/mmate/login.asp"
Build a link on your Corporate or Facility Web Site to the Web Work Request. This may be accomplished via HTML or Javascript as shown below:
For the HTML
Link, the syntax is: “<a href=’url’>link
text</a>”
Example:
“<a href=’fileserver1.widgets.com/mmate/newworkorder.asp’>New
Work Request</a>”
For a Javascript Link, please see the code within <cm web app virtual directory>/default.htm for an example of a Javascript call.
Provide
users with the Mechanic's Mate CM Web Application's URL.
Syntax:
"<Server URL or IP>/<CM Web App Virtual Directory
name>/login.asp"
For example:
"fileserver1.widgets.com/mmate/login.asp"
Approving/Rejecting Web Work Requests
Web
work requests must be approved or rejected from the MechanicsMate
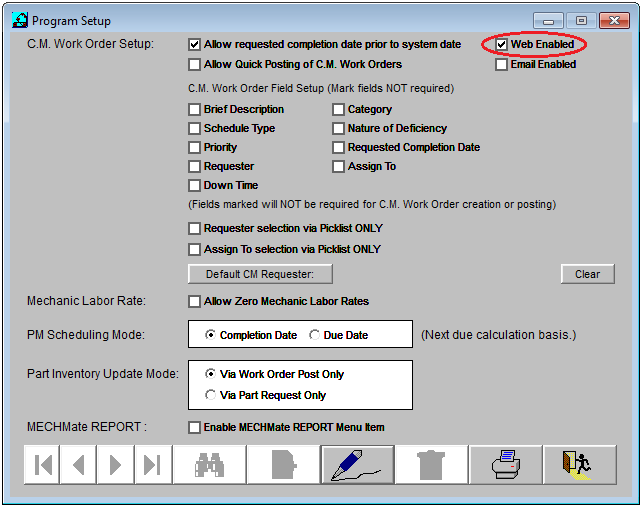
Desktop Application. “Web Enabled” must be turned on
within the MechanicsMate
Program Setup. Select Program
Setup from
the Utilities
menu.
The Program Setup dialog is shown below.
Select
Web
Work Requests from
the Work
Orders
menu.
The approval/rejection dialog is shown below.
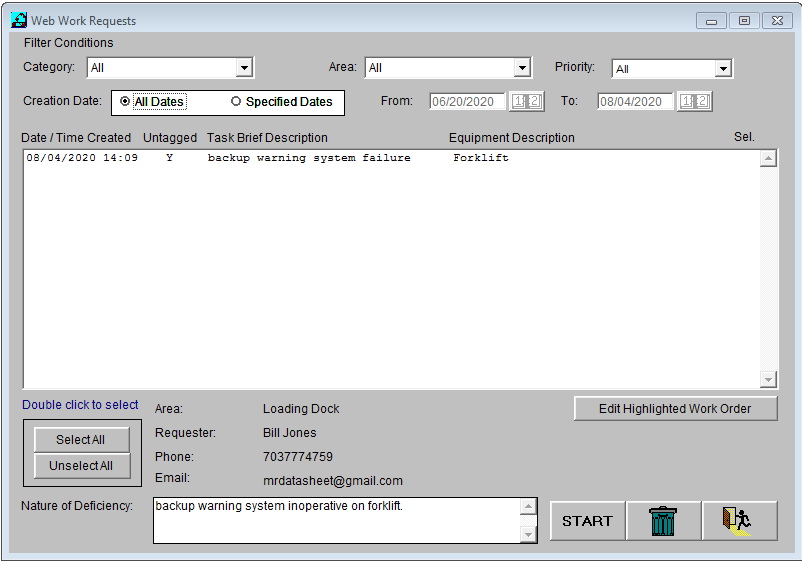
Upon
approval, the work request is converted into a pending cm work order.
Email Notifications of Work Request Status Changes
Email notifications for work request status changes may be turned on or off, and they may be generated at the following points within the software.
Creation of Work Request
Requester Notification (Always ON)
Maintenance Supervisor Notification (configurable)
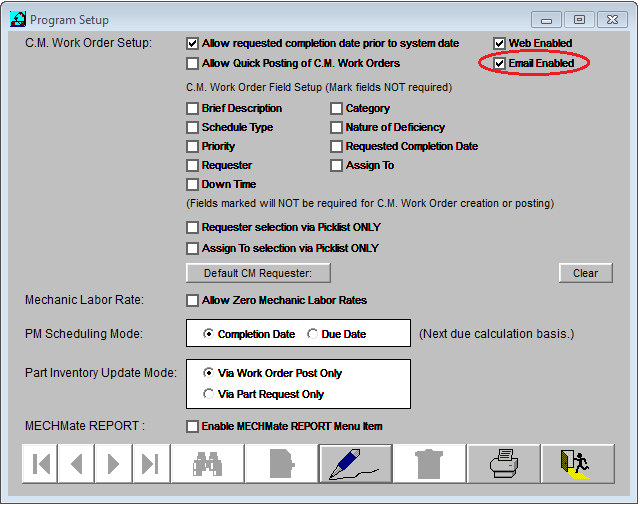
Email notifications for the following work request status changes may be turned on or off via the Email Enabled setting in Program Setup. The following notifications also require the Mechanic’s Mate Mail Service to be running.
Start/Approval in Web Work Requests dialog
Delete/Rejection in Web Work Requests dialog
Completion/Posting from CM Work Order Completion dialog
Deletion from CM Work Order Completion dialog
Email
Enabled must be turned on within the MechanicsMate
Program Setup if you would like to receive ALL of these
notifications. Select Program
Setup from
the Utilities
menu.
The Program Setup dialog is shown below.
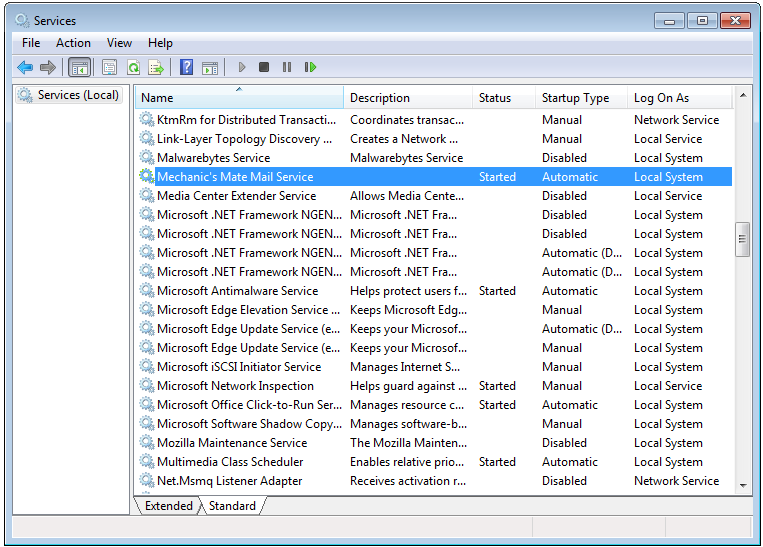
The
Mechanic’s Mate Mail Service must also be set to Automatic and
Started within the Windows Services Console as shown below.